![]() |
Branford Bike
129 Sagittarius Skyway, PO Box 1711, Emigrant, MT 59027 USA |
| Click on the underlined text to: | |
| order online via our Secure Order Form and receive FREE... | |
| or send us an email with your questions or comments. | |
|
Phone Answering Hours M-W-F, 12 noon - 3 PM Mountain Time Information: (203) 488-0482 FAX: (203) 643-8078 |
|
Headset, Seat Posts and Pedals Section: Page 15
Click on an underlined item or scroll down this page to view everything.
|
![]() |
Level of Difficulty
to
|
|
Threadless-type Headset Removal, Installation and Adjustment Typical Tools and Supplies Needed
This article will discuss removing the old headset, installing and adjusting a new threadless headset. See also related articles: |
To skip removal and installation, go to adjustment. 
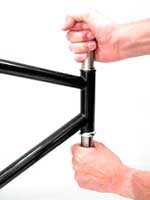
Bearings on a bicycle allow the parts to rotate relative to one another. The headset allows the fork to turn smoothly while riding. Bicycles, and all two wheeled vehicles, make small self-corrections in steering while traveling forward. If the headset is pitted or worn, these corrections are not made smoothly and handling suffers. Very worn headsets tend to "lock up" when the front wheel is pointing straight. Pick up the front of the bike, and gently swing the handlebars back and forth from center. Pitting in the cups will cause the headset to stick as it passes through center position. A pitted headset should be replaced. New headsets are pressed into the frame and fork. All bearings on a bike have some friction as they rotate. This is normal and does not affect the ride. Better quality bearing surfaces are ground smoother and will have less friction and resistance to turning. Adjustable type bearing systems use two opposing races which can be moved relative to one another. If the adjustment is too tight there will be too much pressure on the bearing surfaces and balls and the system will quickly wear out. If the adjustment is too loose there will be movement or "play" between the parts. This will cause a knocking in the bearing surfaces and again they will wear out prematurely. Generally, the bearings should be adjusted as loose as possible without play or knocking in the system. 
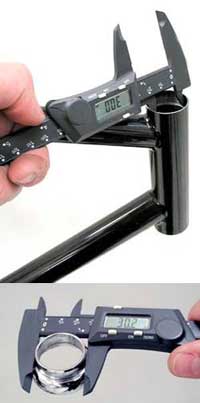
The upper and lower bearing surfaces are connected by the steering column. The two bearing surfaces need to be parallel in order to operate smoothly. If the upper and lower surfaces of the head tube are not cut parallel, the bearings will tend to bind as the fork is rotated. This can lead to premature bearing wear and a less than desired adjustment. The head tube can become deformed by welding or simply less than adequate manufacturing techniques. The base of the fork steering column should also be cut square to the fork. If it is not properly machined, the fork crown race will not sit square to the steering column and will add to the binding effect. The head tube can be machined (faced) so the surfaces are parallel by using the Park HTR-1 Head tube and Facing Tool. The fork can be machined with the Park CRC-1 Crown Race Cutter. Threadless headset bearings are held secure by the stem. The upper adjustable bearing race will slide up and down on the steering column. The stem binder bolts hold the stem secure on the column, which keeps the race from moving. To adjust the race, the stem must first be loosened. There is a cap in the top of the stem that will apply pressure to the race when the stem is loose. A typical threadless headset on the bike, and the various parts are seen below.
|
Headset Removal
|
|
Installing Headset Bearing Races Headset bearing races are held by an interference fit into the head tube. An interference fit occurs when parts are held together by internal and external surfaces forced together. There must be a slight diameter difference between the two pressed surfaces. Typically, the pressed headset race outside diameter should be between 0.1mm and 0.25mm larger than the head tube inside diameter. When the cups are pressed, the head tube will flex and enlarge slightly to allow the cups to press. This tension is what keeps the cups tight in the frame. Use a caliper to measure the outside diameter of the cups. Next, measure the inside diameter of the head tube in two places, each 90 degrees from the other. Average the two reading. If the head tube more than 0.25mm smaller than the race, it may be reamed using the Park HTR-1 Head tube Reaming and Facing tool. If the race is between 0.01mm and 0.09mm, a different headset with a larger press race should be used. It is also possible to use a retaining compound such as Loctite® RC609. If the race is equal to or smaller than the head tube, a different race should be used. See discussion of press fit standards below.
The fork bearing race is pressed to the fork crown race seat. The fork race is smaller than the crown race seat. It is the race that expands as it is pressed. Races are commonly made of bearing steel, which tend to be very hard and brittle, and do not expand to the same tolerances as the head tube. The crown race seat should larger then the race by 0.1mm to 0.15. Much more difference may stress and crack the bearing race. When the crown race seat is too large for the fork crown race, it may be milled smaller with the Park CRC-1 Crown Race Cutter. If the crown race seat is only slightly larger than the race, 0.02 to 0.09mm, use a retaining compound such as Loctite® RC609. If the crown race seat is equal to or even smaller than the race, use a different race. See discussion of press fit standards below. |
|
Pressing the Head Tube Cups This discussion will assume use of the Park HHP-2 Headset Press and the Park CRS-1 Crown Race Setter.
|
|
Setting the Fork Crown Race The fork crown race must be pressed to the fork crown. Determine acceptability of press fit as described above. Place race on fork crown and select most compatible CRS-1 insert. Place tool and insert over fork. Use hammer and strike top of tool until race fully seats. The sound will change as it seats. Inspect sides of race for seating.
Headset assemblyIf the headset is using bearing retainers, check the orientation of the retainers before installing. Retainers have only one correct orientation. The open side of the ball retainer should face the cone shaped race, not the cup shaped race.
It is possible to replace retainer ball bearing with loose bearings. Grease cups to hold bearings, and place balls into cup shaped races. Leave a wide gap the size to two ball bearings, do not attempt to fully fill cup.
|
|
Installing the Star Fangled Nut The threadless headset is adjusted by pressure from the top cap. The adjusting bolt threads into the "star fangled nut". For nut installation, see Star Fangled Nut Installation.
|
|
Threadless Headset Adjustment Threadless headsets work on the same principal as threaded headsets. The bearing races need to press against the bearings. The bolt in the top cap will put pressure on the stem, which presses on washers below the stem, which press on the bearing races, which press against the bearings. NOTE: The cap and bolt at the top of the stem do not secure the stem onto the steering column. The bolt or bolts on the side of the stem keep the stem from moving once the adjustment is made. The cap is used for bearing adjustment only. Begin by removing the adjusting bolt in the center of the steering column. Next, remove the top cap. There may be a star-shaped nut or other fittings inside the steering column. The bolt threads into this fitting and pulls on the fork against the headset bearing surfaces, which acts to tighten the adjustment. Note the height of the steering column relative to the stem. It should be about 3mm (1/8") below the level of the stem. The stem needs to press down on the spacers in order to adjust the bearings. If the steering column is level with the top of the stem, another spacer is needed below the stem.
|
|
Bearing Adjustment and "Feel" Bearing surfaces are made from hardened steel. The surfaces are cut typically by grinding. Round ball bearings roll on the curved surface of the cup and cone. Even the highest quality bearing surfaces will have slight grinding marks. In the left image below is a high quality cone magnified two hundred times. Notice the parallel marks from the grinding stone. Also note a slight pit from wear. The right hand image is a bearing magnified the same amount. It does show some surface marking, but is generally smoother than the cone or cup. Bearing surface smoothness will vary between manufacturers and between models. Some bearing system will simply "feel" smoother because they are smoother. This is why it is difficult to adjust by using a subjective feeling of smoothness. Generally, adjust bearings for the loosest setting that has no knocking or play, regardless of this relative smoothness.
|
|
Headset Sizing Standards There are several standards for headsets found on bicycles. Headsets are names by the diameter of the steering column, not by the press diameter of the cups. For example, a "one-inch" headset is for bikes with one inch diameter steering columns. There are three different headset standards using one inch forks. Two are common, the JIS and "Modern European" standard. The older BMX standard is seen less and less. The JIS and "Modern European" standard differ only in the diameter of the press fit. The two standards are NOT interchangeable, even though both use 1" x 24 TPI threading. A bicycle that was machined to the JIS standard may be reamed and cut to the "Modern European" standard. The head tube would be ream to 30.0mm ID and the fork crown seat cut down to 26.5mm. A bicycle that was made in the "Modern European" standard can not use a JIS headset. Below is a list of "conventional" headset standard sizing. There are now in use other standards and designs, see also Headset Standards and Nomenclature.
|
| Information and photos are courtesy of Park Tool. Visit their site at Park Tool.Com |
| 100% Satisfaction Guaranteed
At Branford Bike we want you to be happy and satisfied with everything you purchase from us. We understand that sometimes you will need to return a product because it was not quite what you wanted. You may return anything you purchase from us within 60 days and unused, for an immediate exchange or refund. |
| Click on the underlined text to go to the... |
|
Page 14 Working with Threaded Headsets |
Headsets Table of Contents |
Branford Bike Catalog Main Table of Contents |
Page 16 Reaming and Facing Tips |
|
Branford Bike Catalog Index Quickly find an item or see everything that is in our catalog. |
|
Order Online via our Secure Order Form and receive FREE expedited processing with email confirmations.
Our Secure Order Form is easy to use. Simply fill in the boxes as you would for a traditional paper catalog
order form.
|
|
Branford Bike Online Catalog - Archival Edition brought to you by the former owner of Branford Bike, Tim Brockett via his personal web site, TimsLife.Com |
|
This is an archival edition of the Branford Bike web site from February 2006. Complete with product photos, prices, how to articles and technical specifications it is a treasure trove of accurate, detailed and historical information. In July of 2006 Branford Bike was incinerated by a huge forest fire. No one was hurt but the inventory and buildings were completely destroyed. I witnessed the fire and stayed until the trees were burning in my driveway. At that point I hiked from Branford Bike, through the smoke and embers, down the mountain to my Jeep 3 miles away. I took photos and wrote about the harrowing experience so everyone could see what I saw. My insurance was generous and I later rebuilt my home and started another business selling books. Read the story here. Branford Bike was a huge part of my life for over 30 years; June 1976 to July 2006. I enjoyed those years tremendously and Branford Bike was often a labor of love. I hope you enjoy browsing through the archival catalog. If your visit brings back pleasant memories please share them with me via e-mail at timbrockett@gmail.com . If you find any printed Branford Bike catalogs, advertisments or flyers please scan them as a PDF and email. Or you may mail them via US Post to Tim Brockett, PO Box 1711, Emigrant, MT 59027. Eventually I will post them in a Memorabilia catalog section. Many Thanks and Best Wishes, Tim Brockett |
| Go to our Secure Ordering Page |
|
For more information, call: (203) 488-0482 Our phone hours are: Monday, Wednesday & Friday, 12 noon - 3 pm Mountain Time To print this page in Netscape Navigator or Microsoft Explorer: |