|
|
|
|
The western cliff and bluff at River Island State Park lack developed trails but the hiking and views are still spectacular. It is a little drier here than on the east side of the park. More cacti and even a palm bush replace the fields of flowers on the eastern cliffs. The footing is more treacherous so good shoes and caution is advised. The easiest way to ascend the cliffs is to scramble with all fours up a ravine behind the amphitheater screen. Thin gloves will make it easier to get a good hold on jagged rocks without cutting your hands. Long pants will protect against thorns and cactus spines.

West Side cliffs at River Island State Park. |

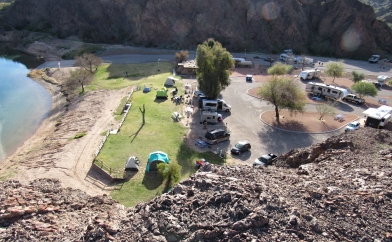
Beach and campsites from the west bluff at River Island Park, Arizona. |

Solid rock basins eroded out of basalt in a steep wash held water for several days after the last rain. Barrel cacti and one with flat, oval sections grew nearby. I followed the steep and rocky wash down to a sandy road that lead to the paved road and back to the park. Two small cactus gardens graced the entrance to River Island park and I wandered around them for over an hour. Many of the plants have identification markers. The gardens are well tended and the plants were thriving.

Teddy Bear Chulla in the cactus garden. |

Stag Horn Chulla cactus in the garden. |

New growth from the edges of cactus plates. |

This Saguaro cactus is about 6 feet tall. |

In the spring of 2017 I purchased a new five foot by ten foot Mirage Excel cargo trailer for a little over $4,000.00. I requested that it have a six foot ceiling, side windows and screens, an RV style door with a screen door and insulation. I studied teardrop trailers, large tents, pop-up trailers and other options since 2014. I wanted a trailer that would be a "tin tent", made to accommodate one person, have room to stand, cost less than $5,000.00 and weigh no more than 1,500 pounds loaded. I also wanted running water and electricity. Eventually I settled upon the idea of outfitting a cargo trailer with features customized for my needs and desires.

Last winter when I was tent camping at various state parks in Arizona I started to study what trailers other folks were using and what features I wanted for my trailer. I enjoyed sleeping in my tent and cooking outside. I slept on a cot with a comfortable three inch inflatable foam mattress. I could stand up in the tent and had 100 square feet of floor space. Inside I had a small table and chair plus the cot. It was cozy.
Nights were long because the sun set at 6:30 and did not rise for almost 12 hours. When it was windy the tent blew sideways but never collapsed. The walls were thin and did not block noise or hold the heat. Every time I moved to another camping spot I had to take down the tent and then set it up again.
I wanted a warm place where I could read and write for a few hours after sunset. A place where I could leave my computer and lock the door behind me when I went for a hike.

The two door Jeep Rubicon can carry 1,000 pounds and I was able to efficiently stow enough supplies and camping gear in it for month long tent trips. Everything had its place and thus everything had to be in its place. A trailer offered me 50 square feet of floor space but 300 cubic feet of interior space. I worked for months on a design to maximize that space.
I store heavy camping items in the Jeep. Firewood, a Coleman ice chest, tools, tire chains and Jeep extra fluids are stored in six gallon milk crates. The Coleman ice chest makes a refrigerator unnecessary as it holds ice for up to five days.
The twin, barn style rear trailer doors, open to a teardrop trailer inspired kitchen. A counter with a stainless sink sits three feet above the floor. Underneath the counter are two sets of Sterilite plastic drawers on the left. Under the sink are two seven gallon water containers. One is connected to a 12 volt pump for fresh water. The other is a gray waste water tank that can easily be lifted out and drained.

Above the kitchen counter is a shelf for more plastic bins. A 12 volt LED light and double outlet, a napkin holder, bowl and paper plate holders are mounted on the underside of the bin shelf. A three tier spice rack adorns the left side wall and a matching sponge and soap holder the right wall beneath a paper towel holder. Under the sink and water storage containers is a small space to hold my two burner propane stove. Cooking I prefer to do outside on a picnic table so grease spatters and odors do not soil or permeate the trailer. Food and kitchen supplies are kept in the Sterilite drawers under the counter. A dustpan and brush and a super handy Camco grocery bag holder sit just beneath the sink.

Atwo burner propane Stansport camp stove handily cooks delicious meals in minutes. When I can connect to camp 110 volt electricity meals are even easier to prepare. An electric tea kettle boils water for morning tea quickly. A toaster warms fresh bagels and bread to a golden brown. Pancakes, eggs and ham get cooked on the propane stove or an electric hot plate.
I wired the trailer for both 12 volt DC and 110 volt AC electricity. The 110 volt is used when the campsite has at least a 15 amp outlet. It powers a small 250 watt space heater, the tea kettle, a toaster and even a hot plate. The 12 volt circuit is powered by a rooftop 100 watt solar panel and 50 amp hour sealed lead acid battery. I charge my computer, phone, camera and toothbrush during the day. At night the 12 volt battery powers the interior LED lights and LED television.
I found some larger LED dome lights on ebay that are as bright as 60 watt incandescent bulbs. They make excellent reading lights.

The Twin XL bed is as long as a queen size but narrower. It folds against the far wall into a space that is just 12 inches wide. Then the outside legs fold down and out of the way. This allows me to comfortably stand up and walk around the inside of the trailer. When the bed is down I still have an 18 inch pathway along the wall with the RV door.
In the front of the trailer I built a small desk for night time reading and computer work. Next to the desk are two Sterilite five drawer cabinets for clothing, paperwork, electrical cords, the computer and odds and ends. Above the desk is a 110 volt surge protector outlet strip that plugs into a GFI outlet or alternatively a 12 volt/110 volt inverter. The other 110 volt outlet is by the kitchen counter and runs off of the GFI outlet so no breakers or fuses are needed.
Above the Sterilite drawer cabinets is an 110 volt/12 volt DC LED television. The solar panel controller box and 12 volt fuse box are conveniently mounted to the trailer's inside front wall. The 12 volt wiring is a little messy but easily accessible.

Sterilite five drawer cabinets, a TV and a small desk and comfortable chair. |

The Twin XL bed folds against the wall in just 12 inches of space. |
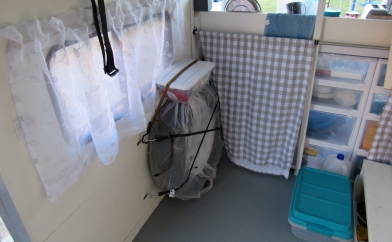
A spare trailer tire is mounted on the inside wall just above the axle for even weight distribution. I wrapped the tire in plastic so it would not mar the wall. Above the spare tire is a shaving mirror, a holder for vanity accessories, a face cloth and towel bar and a small wire basket. Brushing my teeth, flossing and shaving are easily accommodated. There is also enough space under the kitchen shelf to easily access the kitchen sink and running water. On cold days I will heat a little water in the tea kettle and then mix it with cold water in the stoppered sink for shaving. A small LED light rests above the shaving mirror.
The plastic bins and drawer bins on top of the kitchen shelf hold clothing, a wool blanket and the tea kettle and toaster when I am transporting the trailer. Elasticized bunjii cords secure the bins in place for rough roads.

The trailer roof sports a ladder rack which holds a 100 watt solar panel, a UHF and VHF 150 mile range TV antenna, a two mile range Wifi antenna and a green and white striped awning. The TV antenna pole folds down and the antenna is easily removed for traveling. The TV antenna has a small rotor built into it and works very well. I bought it at Walmart.com for about $40.00. The Wifi antenna sits on a removable six foot piece of one inch electrical conduit. It came from C Crane's online store and also works exceedingly well. Unlike the TV antenna it requires software and a USB cord which come with a separate omni-directional antenna kit. I turn the Wifi antenna mast by hand and bring the entire post and antenna inside the trailer when traveling.
The awning came from ebay for $89.99 with shipping. It easily rolls out with a hand cranked pole. I secure it with straps for transport. It can also be removed easily for storage with just two bolts.
People often stop by to check out the trailer and ask questions. They are curious and the trailer holds a certain fascination for them.

A TV antenna with a rotor sits on the back of the trailer. A Wifi antenna is up front. |

A shaving mirror and light, a vanity basket and towel rack. |

I made a point of using second hand materials when finishing the trailer. If I had to purchase anything new I economized as much as possible. The countertop is a plastic folding table top; not granite or synthetic stone! Many items came from thrift stores and add to the trailer's charm. Walmart.com was a major source of supplies.
One place I did splurge was on safety. This was my first full sized trailer and I had little experience towing anything than a 400 pound 4 foot by 8 foot staked trailer. So I purchased a rear view camera system from Rear Views Safety for $299.99. I mounted the camera on the back of the trailer, above the rear doors. The camera wiring follows the trailer roof line and comes down to a mount near the hitch. A removable, coiled cable connects the waterproof plug mount to a similar one on the back of the Jeep. Inside the Jeep I mounted the five inch monitor above my rear view mirror. The camera and monitor draw power from the Jeep via fused cigarette lighter power plug.
The camera is exceptionally well built and completely sealed against the elements. It offers a wide, three lane view of traffic behind and coming up beside me. Infra-red takes over at night time and detects vehicles almost like it was daylight. I can see cars coming up entrance ramps on my right and cars starting to pass me on the left. It also has a grid so I can use it as a backup camera. I no longer feel like I am driving blind with only side mirrors to show me what is around me.

An easily detached coiled cable connects the rear view camera to the Jeep. |
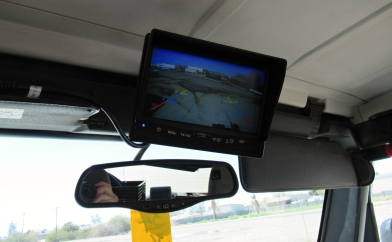
A five inch monitor sits above the rear view mirror. |
Click on the "Bookmark and Share" button to:
What do you think of this page? How can it be improved? Do you have questions about its content? Share your thoughts with Tim and other readers by clicking on "Leave a message". I read every message and will respond if you have a question.
|
Page 1 2019 Arizona Vacation |
Tim's Life Main Table of Contents |

Travel Table of Contents |
Page 3 Alamo Lake State Park |
|
|