![]() |
Branford Bike
129 Sagittarius Skyway, PO Box 1711, Emigrant, MT 59027 USA |
| Click on the underlined text to: | |
| order online via our Secure Order Form and receive FREE... | |
| or send us an email with your questions or comments. | |
|
Phone Answering Hours M-W-F, 12 noon - 3 PM Mountain Time Information: (203) 488-0482 FAX: (203) 643-8078 |
|
Bicycle Cranksets Section: Page 9
Click on an underlined item or scroll down this page to view everything.
Order online via our - Secure Order Form - and receive FREE...
|
|
Crank Removal and InstallationTypical Tools and Supplies Needed |
|
|
|
Crank arms are pressed tightly to the bottom bracket spindle. To service the bottom bracket bearings you must remove the crank arms. On most triple chainring cranks the arms must be removed to replace the chainrings. Older Campagnolo and some newer competitior's cranks use "One-key release" systems which do not require a crank puller. A Stronglight one-key system cap is pictured below. Note the collar with four tiny pin holes which holds the 8mm allen center bolt in place. The collar on older Campy cranks used a left hand thread and held in place a 7mm center bolt. One-Key Crank Release System Crank Removal Tips for Tapered Spindle Bottom BracketsShift your chain to largest chainring so you may protect hands against chainring's sharp teeth. Look for a bolt, nut or cap at the end of your crank arm in line with bottom bracket spindle. If no bolt is visible, remove the dust caps. Some caps pry out and some thread out. Threaded caps usually have a screwdriver slot or allen head fitting. Pry-out caps usually have a lip on one side that a small screwdriver will fit under. 8mm Crank Arm Allen Bolt The most common type of crank arm retaining bolt is an 8mm allen head bolt as pictured above. Use a Park HR-8 hex wrench to loosen and remove this bolt. Threaded crank cap with a 5mm allen slot. Some cranks use a threded cap to cover the crank arm fixing bolt or nuts underneath. We suggest lightly coating the threads with anti-sieze before installing, if the cover is made of metal. Frozen caps may be removed by drilling a small hole on either side of the center hole and using a pin tool. A punch and light hammer will also work but requires a gentle touch so the crank will not be damaged. A bolt (male) or nut (female) is under the crank cap.
Turn the bolt or nut head counter-clockwise to remove. Inspect inside the crank arms for washersand remove if present. |
|
The Park CCP-2 crank arm removal tool consists of two pieces; the arm and threaded driver and the female puller nut. Snug the puller nut with an adjustable wrench. Hold the crank arm firmly and turn the Park CCP-2 driver handle clockwise until your crank comes loose and rests on the bottom bracket spindle. Pull the crank arm from the spindle and unthread both parts of the Park CCP-2 tool from your crank arm. Use extra care so you do not skin your knuckles when removing the tool. Remove the crank arm by turning the driver clockwise. |
Crank Installation Tips for Tapered Spindle Bottom BracketsCrank arms should be pressed tightly onto a matching, tapered bottom bracket spindle. Note how the square spidle is made with a slight upward sloping taper. The crank square fitting has a matching taper. The crank bolt or nut acts as the pressing tool and forces the arm up the slope of the spindle. The bolt or nut must be tight enough to keep from loosening, but not so tight that the spindle damages the crank. A torque wrench is highly recommended for tightening crank arm bolts. 
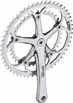
Tapered crank and bottom bracket interface. Aluminum crank arms do not require lubrication for a secure fit. Aluminum by its nature is self-lubricating as it is covered with a thin layer of oxidation. Adequate torque is usually enough to keep the crank arms from creaking. Wipe all sides of the bottom bracket spindle and inside your crank arm mounting holes with a clean rag. Lightly grease under the head and on the threads of both crank arm fixing bolts or nuts. Gently slide your right crank arm on to the right side of your bottom bracket spindle. Thread your crank bolt or nut by hand on to your bottom bracket spindle. Carefully tighten your crank bolt or nut to the manufacturer's recommended torque. Use a torque wrench to tighten crank bolts or nuts. Apply anti-sieze to the threads of your crank cap (if any) and snugly install. Install your left crank on to the left side of your bottom bracket spindle with arm pointing in the opposite direction of your right side arm. Carefully tighten your crank bolt or nut to the manufacturer's recommended torque. Apply anti-sieze to the threads of your crank cap (if any) and snugly install. Wipe off the crank arms and go for a ride! |
| Information and photos are courtesy of Park Tool. Visit their site at ParkTool.Com |
| 100% Satisfaction Guaranteed
At Branford Bike we want you to be happy and satisfied with everything you purchase from us. We understand that sometimes you will need to return a product because it was not quite what you wanted. You may return anything you purchase from us within 60 days and unused, for an immediate exchange or refund. |
| Click on the underlined text to go to the... |
|
Page 8 Crank and Chain Ring Tools |
Cranksets Table of Contents |
Branford Bike Catalog Main Table of Contents |
Next Section Featuring Chains and Chainrings |
|
Branford Bike Catalog Index Quickly find an item or see everything that is in our catalog. |
|
Order Online via our Secure Order Form and receive FREE expedited processing with email confirmations.
Our Secure Order Form is easy to use. Simply fill in the boxes as you would for a traditional paper catalog
order form.
|
|
Branford Bike Online Catalog - Archival Edition brought to you by the former owner of Branford Bike, Tim Brockett via his personal web site, TimsLife.Com |
|
This is an archival edition of the Branford Bike web site from February 2006. Complete with product photos, prices, how to articles and technical specifications it is a treasure trove of accurate, detailed and historical information. In July of 2006 Branford Bike was incinerated by a huge forest fire. No one was hurt but the inventory and buildings were completely destroyed. I witnessed the fire and stayed until the trees were burning in my driveway. At that point I hiked from Branford Bike, through the smoke and embers, down the mountain to my Jeep 3 miles away. I took photos and wrote about the harrowing experience so everyone could see what I saw. My insurance was generous and I later rebuilt my home and started another business selling books. Read the story here. Branford Bike was a huge part of my life for over 30 years; June 1976 to July 2006. I enjoyed those years tremendously and Branford Bike was often a labor of love. I hope you enjoy browsing through the archival catalog. If your visit brings back pleasant memories please share them with me via e-mail at timbrockett@gmail.com . If you find any printed Branford Bike catalogs, advertisments or flyers please scan them as a PDF and email. Or you may mail them via US Post to Tim Brockett, PO Box 1711, Emigrant, MT 59027. Eventually I will post them in a Memorabilia catalog section. Many Thanks and Best Wishes, Tim Brockett |
| Go to our Secure Ordering Page |
|
For more information, call: (203) 488-0482 Our phone hours are: Monday, Wednesday & Friday, 12 noon - 3 pm Mountain Time To print this page in Netscape Navigator or Microsoft Explorer: |